Get to Know ESP32 #1: Blinking Microcontroller
Just one year ago, electrical engineering was never something that I want to deal with. But a couple days ago, it sort of changed. I get curious — even if just a bit.
I got an assignment for a course called Embedded System (which I had always worried about ever since I saw it in my curricula because I never got good grades in subjects involving electrical devices). It will be a weekly project, I suppose, and this week’s project is to make my very first microcontroller, ESP32, blink. (insert claps here, please)
Blink is going to be my ‘Hello world!’ version of ESP32 and microcontrollers.
Before we continue, give me a minute to explain about microcontrollers. Microcontrollers are simply ‘mini computers’, and are considered so because they contain the Central Processing Unit (CPU), RAM, flash memory, and I/O ports. Microcontroller is the heart of embedded system — as it controls the system.
There are a lot of microcontrollers out there, but in this project I bought the NodeMCU ESP-32S with 38 pins. It costs Rp75.000,00, or approximately 5 dollars, which is much cheaper than the famous Arduino Uno. Let me show you how my ESP32 looks.

So how to make this thing blink? Let’s see..
Tools:
a. Type A to Micro-USB B Cable.
b. A laptop with Arduino IDE installed (yes, although the microcontroller isn’t a product of Arduino, we can still use the program). You can find the application in Microsoft Store if you’re using Windows 10, or else you can simply find it in https://www.arduino.cc/en/Main/Software.
c. NodeMCU ESP-32S board, obviously.
All prepared? Okay, let’s jump right to the steps on how to set the Arduino IDE.
- Since we’re not using any of the Arduino products, we have to install the ESP32 board. To do this you can click on File > Preferences, then fill Additional Boards Manager URLs with https://dl.espressif.com/dl/package_esp32_index.json. Click OK afterwards.
- Open Tools > Board Manager. There, you can search for ‘esp32 by Espressif Systems’. Install it by clicking the ‘Install’ button.
- When you’ve installed the package, again, open Tools, then change the current board to ‘DOIT ESP32 DEVKIT V1’
- Pick up your USB cable, connect it your laptop/computer and your ESP32. Next, go to Tools>Port. If you’re unable to click on it (the ‘Port’ option is coloured gray), go to https://www.silabs.com/products/development-tools/software/usb-to-uart-bridge-vcp-drivers to download the USB to UART drivers. There should be one or more ports showing up.
- There is no step 5, hooray! You’re ready to explore Arduino IDE :)
During these steps (which were supposed to be simple) I came across a few problems. First, I can’t find ‘esp32’ package in the Boards Manager. So, I changed the URL to another URL that contained the package. The package showed up, yes, but when I tried to install it, it kept giving me error messages (ugh..), so I decided to change the URL back, and it worked! Next mishap, I tried to plug in the USB cable to my laptop. It showed no ports were available, and my ESP32 wasn’t blinking, which made me confused because in my other friends’ laptop, it automatically went into blinking mode once connected to the laptop. I unplugged it and plugged it again to my laptop’s other USB port, and it did the trick! I felt so happy, and fortunately, the ports were visible at the time I connected the ESP32 to my laptop, so I didn’t have to download the USB to UART driver. (lucky me, one less download!)
Moving on to the next part, we’re now all set to.. *drums rolling* Make It Blink!
For your information, Arduino IDE provides some examples or modules for experiments that are common, and lucky us, blinking is pretty much everyone’s first experiment when dealing with hardware, so yeah, Arduino IDE already has it. You can go to File > Examples, then move your cursor to Basics, and click on Blink.
After the program showed up in a new window, these are steps you need to follow:
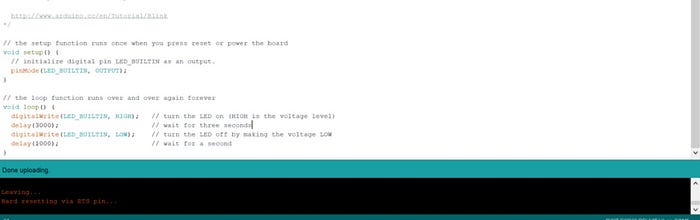
- You can change how long you want the LED to turn on and off. I set the time for the LED to turn on for 3000 ms, and to turn off for 1000 ms.
- Press the tick in the top left which is used for compiling the sketch. Wait until a statement ‘Done uploading’ appears.
- Press the right arrow symbol for uploading the program to the ESP32. Since I’m using a NodeMCU ESP-32S, I need to press the BOOT button (which is located on the right of the USB port) when the IDE states that it’s ‘Connecting..’
- When the program has been uploaded to the ESP32, you will find a text which says ‘Done uploading’. Now, sometimes the LED won’t power on. To handle this, what I have to do is to press the EN button and it will start blinking — just like how it’s supposed to.
Tada! Congratulations, you’ve done your very first program using ESP32 :) Below I put a video which shows how the ESP32 should be working by now.
See you in my next project!